Learn knitting techniques using illustrations - Good luck🤎
Part 1 - Mesh Stitching
Part 2 - Cross-over arrangement
Part 3 - Stitching
Part 4 - Felling
Part 5 - Knit together with multiple colors
PART 1 - Mesh Stitching
Swipe left for more-

Mask stitch
Mask stitch - means to stitch stitches together, so that they form stitches. How to do it: Place the parts to be stitched together right next to each other. Three, the thread up through the top stitch, then into the stitch below and sideways straight into the stitch next to it, so that the thread comes out in the middle of the stitch.
-

Increase stitches to the right
Knit the left needle under the thread between the stitches (from the previous round) from the back, and knit the thread straight into the front max joint as in the illustration above.
-

Increase stitches to the left
Knit the left needle under the thread between the stitches (from the previous round) from the front, and knit and knit the thread straight into the back stitch joint as in the illustration above.


Cross scheme
Flexible arrangement, watch video-

1
First make a loop and insert it onto the needle (= 1st stitch). The yarn end must be long enough for you to cast on the correct number of stitches. To find out how long the end you must have, you can assume that 2 cm of yarn will work for each stitch you will cast on. Calculate a little less for thin yarn laid on thin needles, and a little more for thicker yarn on thicker needles. If you are going to plan for larger works, it pays to plan for e.g. 25 stitches and measure how much yarn was used.
-

2
Hold the needle with the stitch in your right hand, wrap the yarn end around your left thumb and the yarn from the skein around your left index finger. Both strands are held in place with the fingers of the left hand. Tighten the threads in your hand so that you have a good and firm grip. Insert the stick you are holding in your right hand, from the front, into the loop on your thumb.
-

3
Stick the stick behind the loop on the index finger, see arrow in drawing 2.
-

4
Pull the yarn through the thumb loop and pull, while the thumb and forefinger of the left hand spread so that the thread is taut. Let the loop on the thumb slide off. Continue in this manner until you have the correct number of stitches. You must constantly tighten your grip and remember to keep your fingers close together - do not let them slip apart.


PART 3 - Sewing together elastic
Swipe left for more-

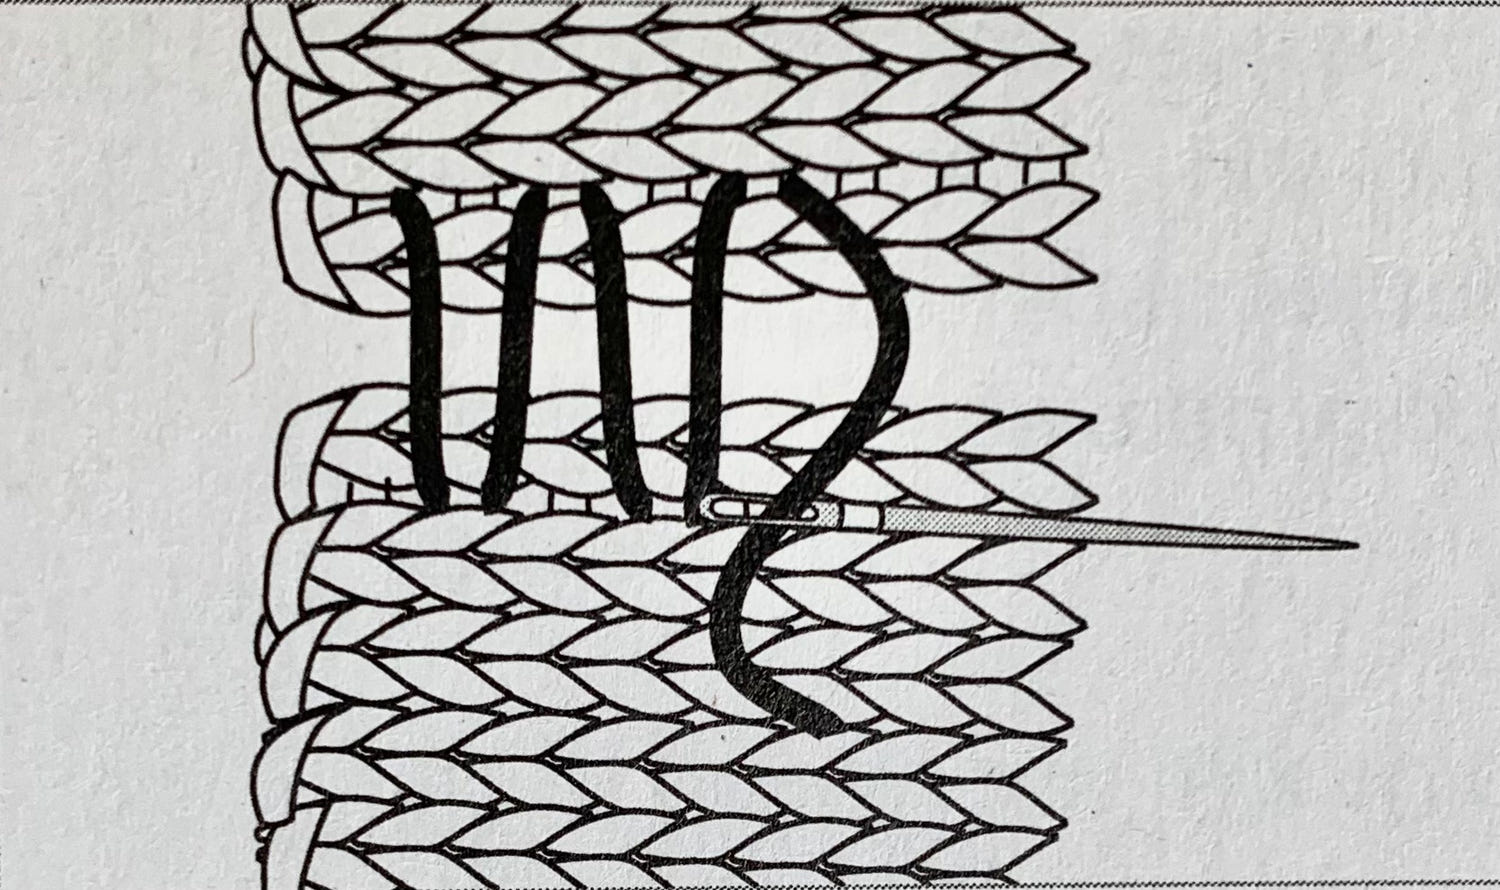
How to Sew Together with Mask Stitch - Part 1
A row of chain stitches looks exactly like a round of knitted stitches.
How to do it: Do not cast off the stitches, but leave them on the needle or thread. Place the stitches with the right sides facing up and with the stitches parallel to each other. Use a darning needle, and sew up through the lower part of the right stitch.
Then insert the needle through the first stitch on the top part and through the side stitch on the same part, back into the stitch you just sewed on the bottom part and up into the next stitch on the same part.
-

How to Sew Together with Stitches - Part 2
Then sew the thread down into the last stitch sewn on the upper part, up through the next stitch on the same part, up through the next stitch on the same part, etc. Pull the thread at regular intervals to even out the stitches.
-

How to sew together with mattress stitch
Mattress stitch - sewn from the right side and gives a completely invisible seam. Place the parts parallel with the stitches facing each other. Insert the needle at the thread that runs between the edge stitch and the stitch inside on the second left of the upper part. Then continue by catching the thread on the next round alternately on the lower and upper part. Pull the thread carefully so that the seams become invisible.


PART 4 - Felling ◀
Show video capture-

Note that:
Watch videoNote that on armholes and necklines, the stitches are usually decreased at the beginning of the round.
-

Felling - part 1
For armholes and necklines, decrease at the beginning of the round. How to do it : Slip the first stitch off the needle.
-

Felling - part 2
knit the next stitch, and pull the previous stitch over the last stitch using the left needle. Repeat until there are no stitches left, or until the desired number of stitches have been cast off.
-
Felling - part 3
Knit back and forth as usual, and decrease as previously described. Turn the garment and remember to only slip the first stitch without knitting it.


PART 5 - Knit together with multiple colors ◀
Fastening thread while knitting - video-

Intarsia technique - Part 1.
This technique is perfect where you use more than one color in the same round, and where the distance between the colors is relatively large, e.g. with large figures.
-

Intersia technique part 2
How to do it: separate the skeins so that the threads don't get tangled on the back. When changing colors, cross the threads so that there are no gaps between the colors.
-

Jacquard technique - part 1
To knit a motif or a border in several colors, the jacquard technique is perfect. Here's how to do it : Knit stitches from the pattern diagram. One square in the diagram corresponds to 1 stitch and 1 yarn over.
Hold both threads on the back of the garment and knit in the color chart. When changing colors, cross the threads on the back to avoid holes on the sides. The threads that are not used will then be on the back. Make sure that the threads are not too tight, so that there are bulges in the garment and so that the pattern does not contract.
-

Jacquard technique - part 2
Keep both threads on the back of the garment and knit in the color chart. When changing colors, cross the threads on the back to avoid holes on the sides. The threads that are not used will then be on the back.
-

Jacquard technique - part 3
Make sure that the threads are not too tight, causing dents in the garment and preventing the pattern from contracting.


